Third prototype

Cooking and boiling water container test one:

For my third prototype I wanted to test how cooking potato inside an enclosed space without stirring them would work. I also wanted to test to see how hot the water would get inside of an enclosed space. Both cans can ventilation holes.

Potato:

13 minutes the potato can is starting to steam and you can smell the potatoes cooking. You can hear the oil from the potatoes sizzling. The potato cans not been shaken or moved so what ever is cooked on the bottom might be different to the top

  • The potato at the bottom of the can burnt due to being extremally close in the fire. As where the potato at the top was cooked through but didn’t burn.
  • The potato was 85 degrees Celsius at the end of the 16 minutes.

Water:

13 minutes in the water can has condensation on the outside.
The water temp at the end of 16 minutes was 90 degrees Celsius.
The starting water level height was 85mm
The end water level height was: 80mm
5mm decrees in the water height.

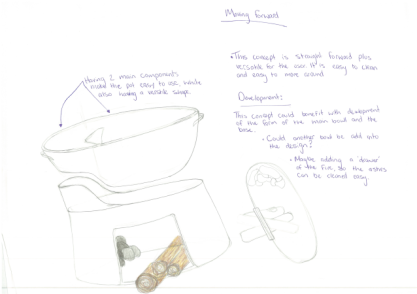
Moving forward.

The reason the potato burnt at the bottom of the can and the potato on the top of the can was cooked through without any burning was becuase the potato was sitting directly on top of the fire with no space in between. Moving forward I’m going to develop my current concept and add a ‘layer’ of protection in between the fire and the food to stop the burning issue.
I want to continue with the development of baking foods within an enclosed space.

Concept development

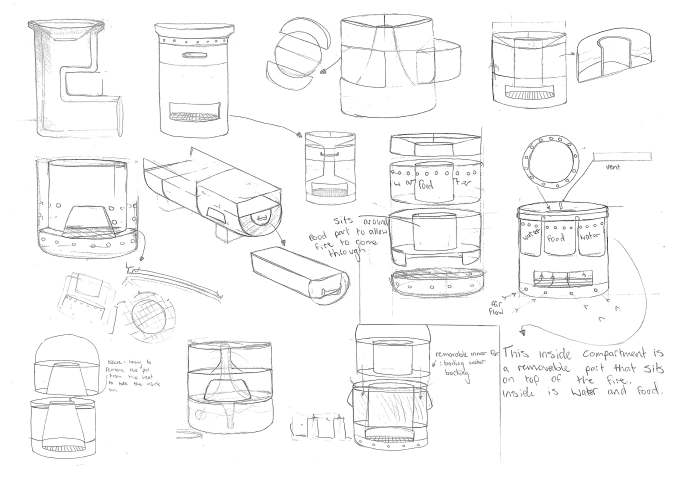
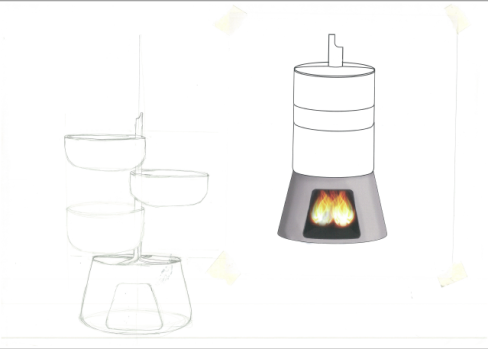
Moving forward with the development of the cookstove, I have developed a concept where the cookstove has an inner compartment that could hold food and water while also allowing there to be the top element for a pot.

The reason I want to create a cookstove with an inner compartment for cooking and water boiling is to allow for the cook to proper multiple meals and purify water all at once to allow for more efficient method, allowing the women to spent more time doing other tasks. 

  • Moving forward I need to prototype the idea of boiling water and cooking food in an enclosed container on top of the fire. This is to see if my idea will work.

developement

Second Prototype


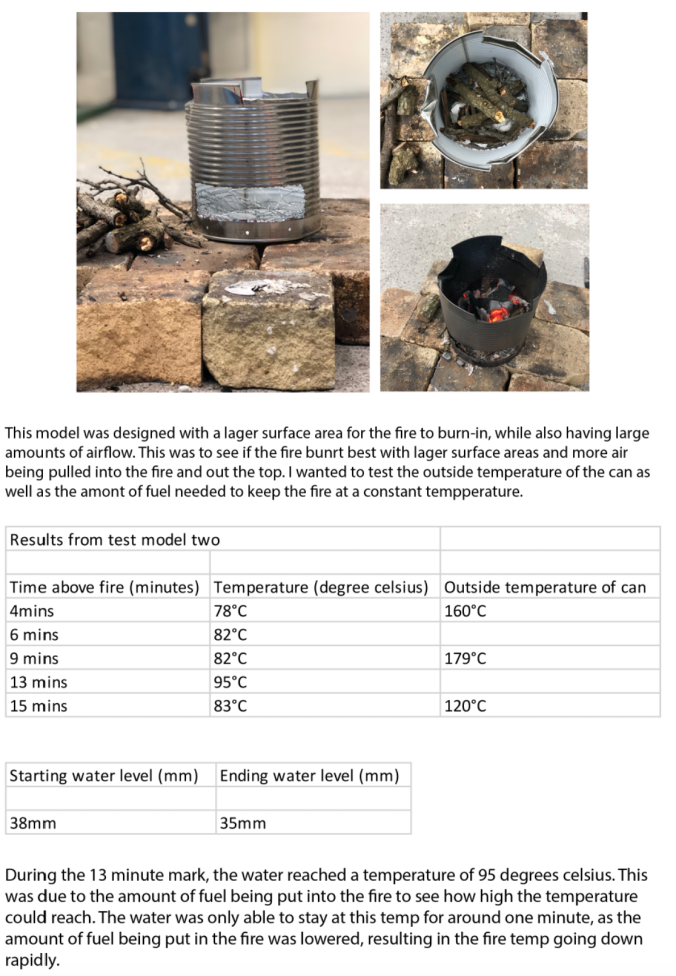
• Test two – due to the surface area being larger the amount of fuel needed to maintain a good level of heat was all most impossible. Restocking the fire would happen every 2-3 minutes because of the fire was left for a longer period it would hurt out.
• This method made the water reach the highest level of 92 degrees after 13 minutes of constant fuel restocking. This temp was only reached for one minute as the fire was not restocked quick enough for the heat to maintain.
• The amount of fuel needed for this model was unstainable for the women of PNG as its using to much fuel with no / not enough results.
• The fire was more of a ‘wild’ fire – where the fire didn’t have a consisted pattern or level of temp or heat. The amount of airflow most likely was allowing for the fuel (sticks) to burn more rapidly.
• Due to the fire leaning straight onto the can the outside temp of the can reach a high of 179 degrees this temp is high enough to level serious burns if touched.

First Prototyping

For the first stages of prototyping I have decided to make two designs out of bulk aluminium cans to test how the different designs affect the way the fire reacts.


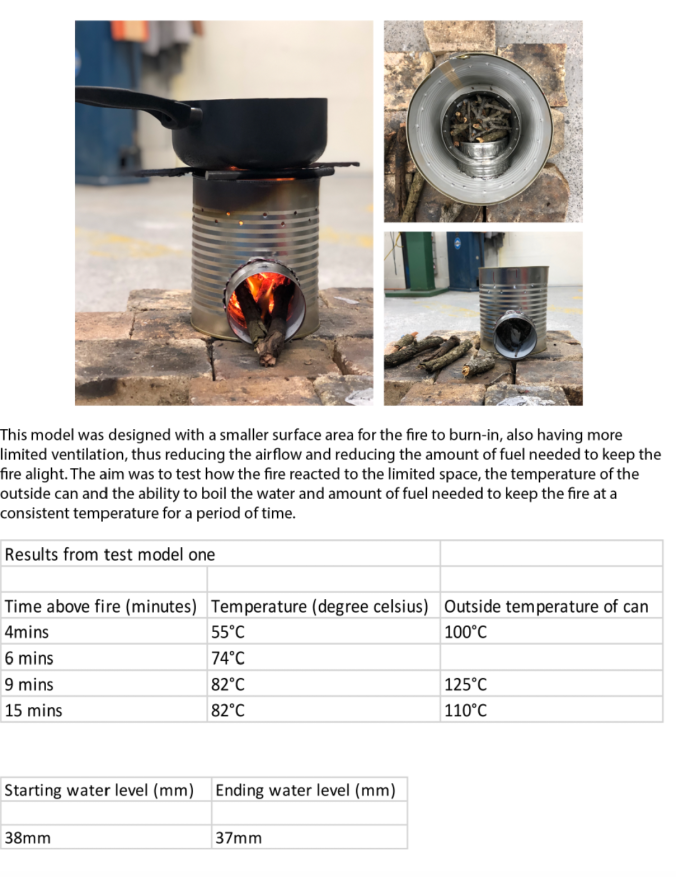
• Test one – This design concept needed much less fuel as there was less surface area for the fuel to over.
• This design concept of a larger can for the outside and a smaller can for the inside where the fire was light. The idea behind this concept was 1, to see how the fire reacted and worked and 2, to minimize the heat of the outer can, this is to minizine the risk of burns while the fire it alight. The outside can only reached a high of 107 degrees.
• This meant the fuel kept at a steady temperature for a longer period. The fire was able to keep water at a steady temp of 82 degrees for 6 minutes
• This model was able to keep the water at a consisted temp while using a minimal amount of fuel.


Development – learning about fire

From my initial concepts, I took a step back and realized I needed to learn more about how fire, flames, and smoke works so I could design a well-informed product. 

the main points I learned from this research are: 

  • To create fire, you need 3 main elements which are – Fuel (wood), Oxygen (Air) and Heat (Initial flame). 
  • The reason heavy thick smoke is created in some fires is due to there not being steady air-flow moving through the fire. When I steady air-flow is running through the fire the smoke is reduced dramatically creating hardly any harm to people around it.
  • The smoke needs to attach to an elevated object to move up and out of peoples faces. An example of this is when you light a bomb fire and there is not an elevated object such as a tall stone inside the firepit. The smoke attaches its self to the tallest object that is surrounding the fire (the spectaters), this is why when you are around a bomb fire it can feel as if the smoke is following you.  

Student feedback on concepts

Friday’s class the feedback I received was positive and constructive. I found it very helpful in regards to moving forward in my design development.

  • Hannah and Sheryl gain me my written feedback. They expressed how concept two was a confusing design as the stacked layers would not retain the heat well and could become unbalanced when the user is to move the pots around the axis, also that removing every pot to get to the last layer doesn’t work too well. Personally, this was my most thought-out and complicated design, having this feedback has made me aware I need to develop this idea further.


  • Hannah and Sheryl liked concept one the most as it is straight to the point and would work well. The one pot design would work well for women who aren’t able to left heavyweights. Personally, I would want to develop this idea further while still maintaining the simple aspect and not over complicating it.

Three concepts

For Friday’s concept class, I have picked my ‘favorite’ three concepts. I think these three show very different ends of my potential design outcome.
Concept 1:
A pot/pan design, where the pot and pan are one item and can be removed from the base where the fire is lit, for serving the food.

Screen Shot 2019-05-30 at 4.44.24 PM

Concept 2:
Focusing on different cooking methods, Boiling, Frying Mumu. (a form of baking in Papa new guinea, using hot stones). This design has layers of pots that rotate on around chimney. You move the pot out to add or mix the food then rotate the pot back, so the pot above acts as a lid.

Screen Shot 2019-05-30 at 4.43.59 PM

Concept 3:
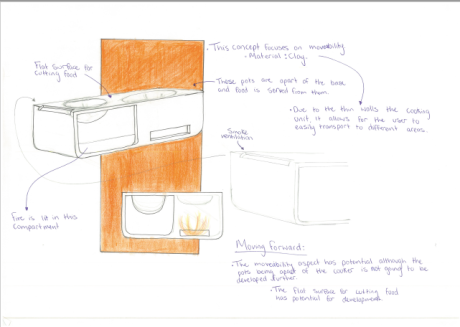
This concept focuses on movability. The fire is light under the pot section and there is ventilation on the side. For cooking, there is a deeper pot for the main cooking and to the side a shallower pot for warming or frying.

Screen Shot 2019-05-30 at 4.44.29 PM

Feedback + Concepts areas

After the presentation Rodney gave some good feedback about analyzing the images I was sent from Papua new guinea instead of just having them in my report, explaining what’s in them that the reader needs to be aware of.

After speaking to Lyn about my report I feel confident in the outcome of my primary research. Lyn and I also decided I would have 3 different areas to focus my designs concepts on.

One: I would design a product that focuses on safety, this being from the fire and smoke.

Two; The equipment side of the product, for example, making the products have more than one pot or pan.

Three: detailed design acting on all finding of the research. – creating a movable, safe, well designed (fancy) product.
From here I went on to design in these multiple areas.